The Stick Handled Athame
I make and sell some really, really nice athames, but it’s labor intensive work so they end up being expensive. It’s nice to have fine tools, but you don’t really need them - you could easily use a kitchen knife as an athame… but I’m thinking that a lot of people would enjoy making an athame for themselves.
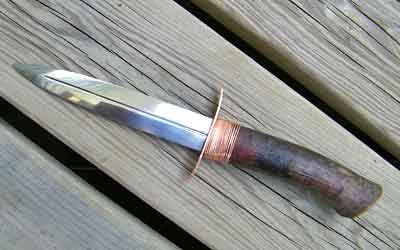
I think I’ve figured out a way that almost anybody can make a nice athame quickly and easily, with very few special tools. I call this the Stick Handled Athame because… well… it uses a stick for a handle. You should be able to make one of these for around $30 - 40, even if you have to buy most of the tools. If you follow my instructions, here’s what you’ll end up with:
You will need a few tools and supplies. Here’s what you’ll need (from left to right):
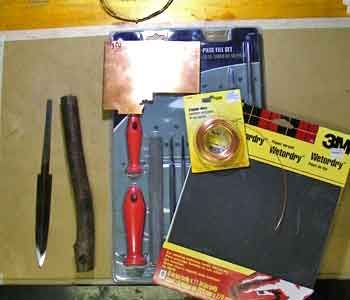
A. A knife blade. The one I’m using is about 6 inches long. You can use a larger one if you like. I suggest that you get your blade from Atlanta Cutlery - they have good blades at excellent prices. Here’s a link: http://www.atlantacutlery.com/c-90-k...-supplies.aspx . They call this one a boot dagger blade, and it costs $13.
B. A stick. Ideally you’ll cut a sapling, let it dry in the basement for a year, then use it. Less than ideally you will find a fallen branch and use that. The problem with the branch is that by the time it drops from the tree it has already begun to deteriorate and is more likely to split when you are working with it. If you do use a fallen branch, I recommend that you do the “optional” step of wire wrapping the end - this will keep the wood from breaking later on while you are using it. Or, you could carve out a chunk of wood.
C. Some kind of metal for the guard. I recommend either copper or brass because they are easy to work with. I also suggest that you use 14 or 16 gauge metal (the gauge refers to the thickness) because that would be heavy enough to be substantial, but not so heavy that you’ll have trouble working with it. Your best price for copper or brass will come when you buy a 12” x 12” sheet from a jewelry supply company, like
Contenti (http://www.contenti.com/products/metals/560-123.html), but if you are only making one, you might want to get your small piece of metal from onlinemetals.com (http://www.onlinemetals.com/merchant...253&top_cat=87).
D. A set of files. The set I have pictured comes from Home Depot, and cost about $12. It has every thing you’ll need. It even comes with file handles!
E. Copper or brass wire. I suggest 18 or 20 gauge. You can get a spool of this from most hardware stores (like Ace) for around $5. This is optional, by the way, but I think it’s a nice touch.
F. Sandpaper. Get a variety pack of wet/dry sandpaper. This will work on both metal and wood.
G. Miscellaneous stuff - masking tape, pencil, two part epoxy glue, flat sticks, ruler, hack saw and hack saw blades, wood saw, a bunch of heavy rubber bands, a center punch, hammer, assorted drill bits and a drill.
---------- Post added at 09:18 PM ---------- Previous post was at 09:07 PM ----------
I make and sell some really, really nice athames, but it’s labor intensive work so they end up being expensive. It’s nice to have fine tools, but you don’t really need them - you could easily use a kitchen knife as an athame… but I’m thinking that a lot of people would enjoy making an athame for themselves.
I think I’ve figured out a way that almost anybody can make a nice athame quickly and easily, with very few special tools. I call this the Stick Handled Athame because… well… it uses a stick for a handle. You should be able to make one of these for around $30 - 40, even if you have to buy most of the tools. If you follow my instructions, here’s what you’ll end up with:
You will need a few tools and supplies. Here’s what you’ll need (from left to right):
A. A knife blade. The one I’m using is about 6 inches long. You can use a larger one if you like. I suggest that you get your blade from Atlanta Cutlery - they have good blades at excellent prices. Here’s a link: http://www.atlantacutlery.com/c-90-k...-supplies.aspx . They call this one a boot dagger blade, and it costs $13.
B. A stick. Ideally you’ll cut a sapling, let it dry in the basement for a year, then use it. Less than ideally you will find a fallen branch and use that. The problem with the branch is that by the time it drops from the tree it has already begun to deteriorate and is more likely to split when you are working with it. If you do use a fallen branch, I recommend that you do the “optional” step of wire wrapping the end - this will keep the wood from breaking later on while you are using it. Or, you could carve out a chunk of wood.
C. Some kind of metal for the guard. I recommend either copper or brass because they are easy to work with. I also suggest that you use 14 or 16 gauge metal (the gauge refers to the thickness) because that would be heavy enough to be substantial, but not so heavy that you’ll have trouble working with it. Your best price for copper or brass will come when you buy a 12” x 12” sheet from a jewelry supply company, like
Contenti (http://www.contenti.com/products/metals/560-123.html), but if you are only making one, you might want to get your small piece of metal from onlinemetals.com (http://www.onlinemetals.com/merchant...253&top_cat=87).
D. A set of files. The set I have pictured comes from Home Depot, and cost about $12. It has every thing you’ll need. It even comes with file handles!
E. Copper or brass wire. I suggest 18 or 20 gauge. You can get a spool of this from most hardware stores (like Ace) for around $5. This is optional, by the way, but I think it’s a nice touch.
F. Sandpaper. Get a variety pack of wet/dry sandpaper. This will work on both metal and wood.
G. Miscellaneous stuff - masking tape, pencil, two part epoxy glue, flat sticks, ruler, hack saw and hack saw blades, wood saw, a bunch of heavy rubber bands, a center punch, hammer, assorted drill bits and a drill.
---------- Post added at 09:18 PM ---------- Previous post was at 09:07 PM ----------


Comment